How to Insulate your Home’s Garage Door – an Easy Weekend Project
Although it only moves in two directions, your home’s garage door serves multiple purposes. Not only is it a necessary structure for keeping a garage secure, it also has important implications for your home’s energy efficiency. As a large path for heat to leak out of your home, an un-insulated garage door could be the downfall of an otherwise energy-efficient home. Fortunately, completing an easy garage door insulation installation this weekend can bolster your home’s energy efficiency and contribute to heating and cooling cost relief.
Before you insulate your garage door, ensure that the door leading from your home to the garage is sealed properly. If there are air leaks through the cracks around the door, energy is lost and the weather stripping will need to be replaced. Weather stripping kits are available for the bottom of the door and around the edges of the door to prevent air leaks.
Once your garage is sealed, you are ready to insulate the garage door. The first step of this weekend project is procuring a garage door insulation kit. These kits are an inexpensive DIY solution for insulating your garage door, and with common household tools, the job will be done in under an hour. Garage door insulation kits can be found at leading home improvement stores. When you receive your kit, you will find eight expanded polystyrene (EPS) insulation panels with grooves cut in the backside for flexibility and easy installation. These energy-efficient foam boards are engineered to provide long-term moisture resistance and high-end insulating performance on a budget.
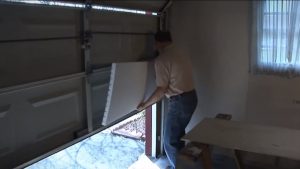
After you have your garage door insulation kit in-hand, measure the length of your garage door from one vertical rail to the center of the door. Make sure you measure each section of the door to ensure accuracy. Be mindful of latches or other attachments built into the door. While measuring, make adjustments to leave space on the panel for these features. When you are satisfied with your garage door measurements, retrieve your first EPS board and cut it to the measured length.
In order to properly install the insulation, face the grooved side of the EPS board toward the garage door. Insert one end of the board behind the vertical rail of the garage door and work your way to the center of the door by slightly flexing the board into place behind the center rail. When installed properly, garage door insulating EPS boards will not require any glue or tape to stay in place. Repeat this process with the rest of the garage door sections for a professional-looking finish and an upgraded energy-efficient garage.